If you are following our Ultimate Guide to Bodyweight Workouts at Home, you are doing Squats, Lunges, and Push-ups.
That is a fantastic start.

But there is a trap waiting for you.
Most “at-home” workouts are Push-Dominant.
You push the floor away (Push-ups), you push gravity away (Squats).
Very rarely do you Pull.
In the gym, you have Lat Pulldowns and Rowing machines.
At home, ignoring these muscles leads to muscle imbalances, rolled-forward shoulders, and eventually, shoulder pain.
Why You Need to “Pull”
- The Problem: Push-ups work the front (Chest). If you ignore the back, you risk “hunchback” posture.
- The Balance: For every pushing exercise, you should aim to do a pulling exercise.
- The Challenge: Gravity makes it hard to pull yourself up without something to hang from.
- The Solution: Creative bodyweight moves + one essential piece of gear.
In this guide, we will show you how to train your Back and Biceps at home to build a balanced, healthy physique.
Level 1 – No Equipment (The Floor & Door)
If you truly have zero gear, you can still wake up your back muscles using friction and household items.
1. The “Superman” (Lower Back)

- How: Lie on your stomach, arms extended in front of you. Lift your arms and legs off the ground simultaneously, squeezing your lower back and glutes.
- Hold: 3 seconds. Repeat 15 times.
- Why: Strengthening the lower back protects your spine during daily life.
2. The Doorframe Row (Upper Back)

- How: Stand in a sturdy open doorway. Grab the frame with both hands. Lean back until your arms are straight. Pull your chest through the doorframe, squeezing your shoulder blades together.
- Progression: The lower you grab (and the more you lean back), the harder it gets.
3. The Towel Row (Isometric)
- How: Lie on your stomach. Hold a towel in both hands, arms stretched out. Pull the towel apart as hard as you can (tension) while pulling your elbows down to your ribs.
- Why: It engages the Lats (the “wings” of your back) without weights.
Level 2 – The $20 Upgrade (Resistance Bands)
The floor has limits.
To really build muscle, you need to pull against resistance.
This is where Resistance Bands with Handles shine.
They are cheap, storable, and effective.
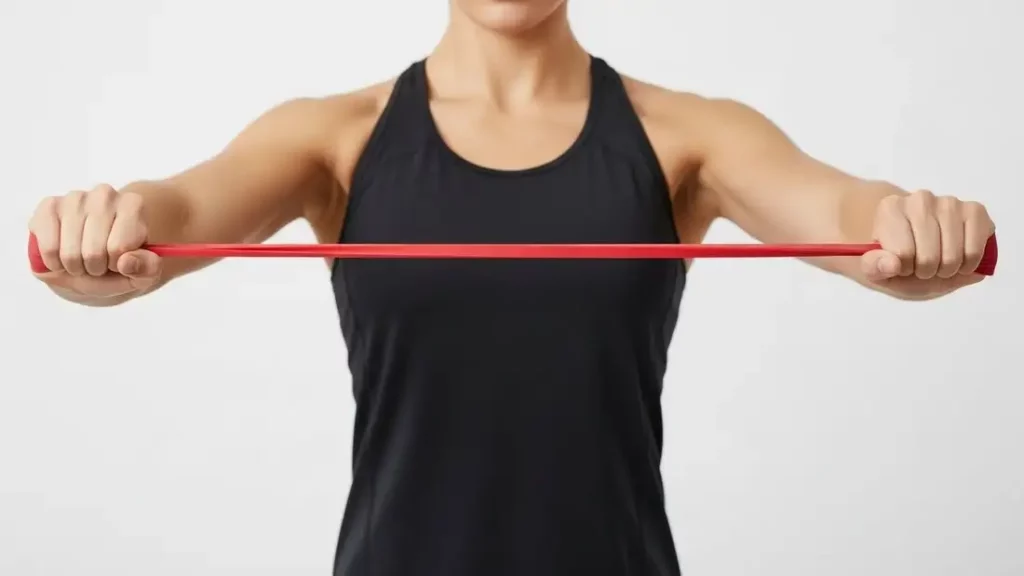
- The Band Pull-Apart: Hold the band in front of you and rip it apart. This bullets-proofs your shoulders.
- Seated Row: Sit on the floor, wrap the band around your feet, and row the handles to your ribs.
Related Read: Which Resistance Band is Right for You? A Beginner’s Breakdown.
Level 3 – The Gold Standard (The Pull-Up Bar)

If you are serious about home fitness, there is one tool that offers the best ROI (Return on Investment).
The Doorway Pull-Up Bar.
It costs less than a month at the gym, installs in seconds without screws, and unlocks the king of all upper-body exercises: The Pull-Up.
- Why it works: The Pull-Up works your Lats, Traps, Biceps, and Forearms all at once. It creates that coveted “V-Taper” shape.
- Can’t do a Pull-Up yet? No problem.
- Use the bar to just Dead Hang (great for shoulder health and grip strength).
- Use a Heavy Loop Band to assist you up.
- Do “Chin-Up Negatives” (Jump up, and lower yourself as slowly as possible).
Our Recommendation: Look for a “Multi-Grip” bar on Amazon that protects your doorframe.
How to Add This to Your Routine
You don’t need a separate “Back Day.” Just integrate these moves into your 20-Minute Bodyweight Circuit.
The Balanced Routine:
- Squats
- Push-Ups (Push)
- Doorframe Rows OR Band Rows (Pull)
- Lunges
- Plank
By adding that one “Pull” movement, you ensure your body grows evenly.
Frequently Asked Questions
- Can I build big biceps with just bodyweight?
It is difficult without a pulling motion. Push-ups work the triceps (back of arm). To get biceps (front of arm), you need to pull. Chin-ups (palms facing you) are the #1 bodyweight exercise for big biceps. - Are doorway pull-up bars safe?
Yes, if used correctly on a sturdy doorframe. Always check that the molding is secure. Do not perform swinging motions (kipping); keep your movement controlled. - I can’t do a single pull-up. What should I do?
Start with “Australian Pull-Ups” (Bodyweight Rows). You can do these by lying under a sturdy dining table, grabbing the edge, and pulling your chest up. It trains the exact same muscles with less weight.
Conclusion – Don’t Be a “Hunchback”

Training your back isn’t just about looking good in a t-shirt (though it helps!).
It’s about counteracting the hours we spend hunched over computers and phones.
A strong back pulls your shoulders down and back, instantly making you look taller and more confident.
Remember, a strong back needs a strong front to stay balanced.
Pair these pulling exercises with our Safety-First Ab Workout Guide to build a bulletproof torso.
Ready to complete your physique?
You now have a fully comprehensive plan.
From the basics to the routine, recovery, and now the missing link.
Go back to the hub to review the full strategy: [The Ultimate Guide to Bodyweight Workouts at Home].
(Disclaimer: This content is for informational purposes only. Consult a physician before starting any new exercise program.)