Congratulations! You’ve taken the fantastic step of bringing a new exercise bike into your home (or you’re about to!).
Whether you’ve chosen the perfect model using our Ultimate Beginner’s Guide to Choosing and Using an Exercise Bike at Home, or perhaps you’ve weighed the Upright vs. Recumbent vs. Spin Bikes differences, you’re now ready to roll.
But hold your horses (or your handlebars, rather)! Before you hop on and start pedaling away, there’s one incredibly vital, yet often overlooked, step: proper setup.
Getting your exercise bike setup for beginners absolutely right isn’t just a nicety; it’s the bedrock of a comfortable, effective, and injury-free workout.
A few minutes invested here can save you hours of discomfort and frustration down the line.
This guide will walk you through every critical adjustment – from seat height to handlebar position – ensuring your ride feels tailor-made for you.
Let’s transform that shiny new machine into your perfect fitness partner!
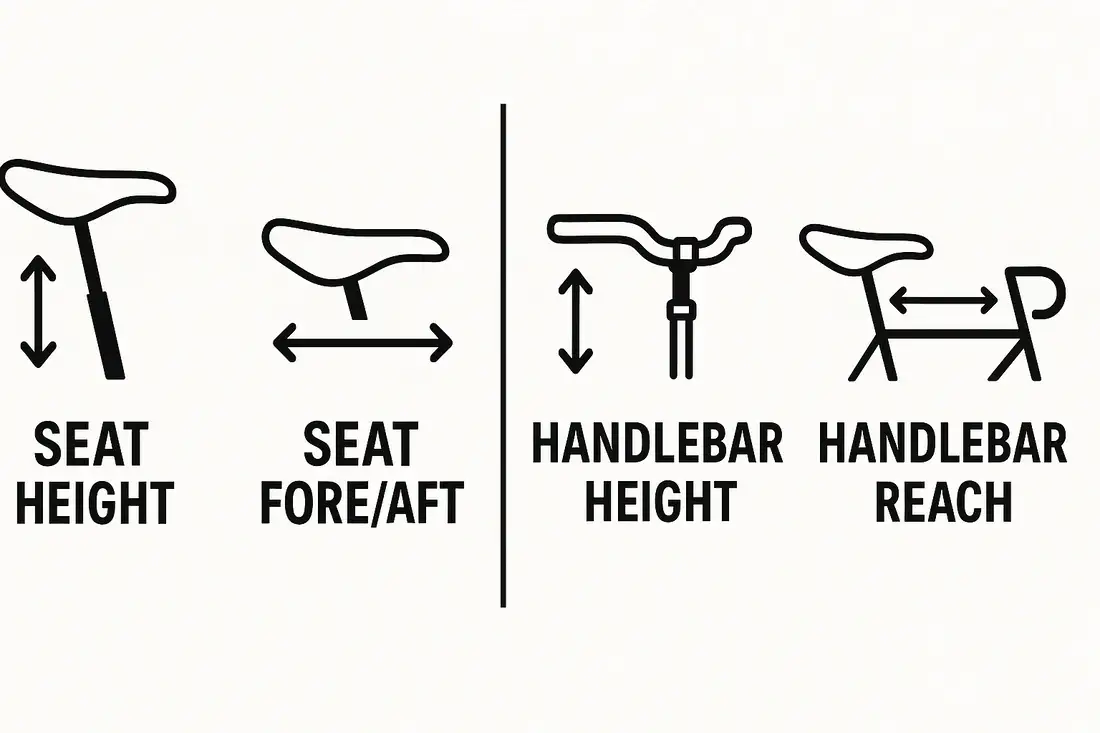
Your Setup Success Checklist: Don’t Ride Until You’ve Checked These!
- Seat Height is paramount: Aim for a slight, soft bend in your knee at the bottom of the pedal stroke.
- Seat Fore/Aft (Horizontal) Alignment: Ensure your front knee aligns over the pedal spindle.
- Handlebar Harmony: Position for relaxed shoulders, a neutral spine, and comfortable reach.
- Level Ground: Your bike should sit stable and not rock.
- Why does this matter? It prevents pain, boosts power, makes every ride more enjoyable, and encourages consistency!
The “Why Bother?” – The Underrated Importance of Nailing Your Bike Fit (Especially for Newbies)
It’s tempting to just assemble, sit down, and start pedaling. But consider this: your exercise bike isn’t a one-size-fits-all shoe.
Just like a custom-tailored suit fits better and moves with you, a properly adjusted bike fits your unique body.
A. Beyond Just “Feeling Okay” – The Real Impact of Proper Setup
A few minutes dedicated to setup can dramatically alter your entire cycling experience:
- Injury Prevention: This is paramount. Incorrect setup is a leading cause of common cycling discomforts like knee pain (often from a seat that’s too low or too far forward), lower back strain (from reaching too far for handlebars), neck stiffness, and numb hands or wrists. Investing time now protects your body. For instance, research often links improper bike fit to patellofemoral pain (pain around the kneecap) in cyclists.
- Enhanced Performance & Efficiency: When your bike is set up correctly, your leg muscles can exert force more efficiently through the pedals. This means you’ll get a better, more effective workout with less wasted energy and fatigue.
- Increased Comfort & Endurance: A comfortable ride is a longer ride. When you’re not constantly shifting to alleviate pain or discomfort, you’ll naturally find it easier to extend your workout duration and push yourself a little further.
- Motivation Booster: Let’s face it: if every ride is a struggle against discomfort, you’ll find excuses to skip. A well-fitted bike is a bike you’ll actually want to use regularly. My own experience taught me this the hard way – a few painful rides almost made me abandon my upright bike until I invested time in adjusting it properly.
B. The Common Beginner Pitfall – “Good Enough” is Rarely Good Enough
The biggest mistake beginners make is settling for “good enough.” They adjust the seat quickly, hop on, and if it doesn’t immediately hurt, they assume it’s fine.
But subtle misalignments can lead to cumulative strain over time. Resist the urge to rush!
A few minutes of careful adjustment will save you hours of potential discomfort and lost motivation later on.
Pre-Setup Essentials – What You’ll Need & Initial Checks
Before we dive into the specifics of adjusting, let’s gather your “toolkit” and make sure your bike is ready.
A. Your Toolkit (Usually Minimal)
- Your Exercise Bike: Unboxed and assembled, if it’s new.
- Allen Wrenches/Spanners: Often come with the bike, or you may need a standard set.
- A Wall or Stable Object: To lean against for support while you adjust.
- Optional but Helpful:
- A Friend: An extra pair of eyes to observe your form can be invaluable.
- A Plumb Line: A piece of string with a small weight (a nut or washer works fine) – incredibly useful for precise knee alignment.
B. Level Ground is Key
Ensure your exercise bike is placed on a flat, stable surface.
If your floor is uneven, most quality exercise bikes come with adjustable levelers (small feet that can be twisted up or down on the bike’s stabilizers).
Take a moment to adjust these until the bike sits perfectly still without any rocking. A wobbly bike is distracting and can compromise safety.
The Core Four Adjustments – Step-by-Step Guide for Beginners
These are the most critical adjustments. Take your time, and don’t be afraid to fine-tune!
A. MASTERING SEAT HEIGHT – The Foundation of Your Fit
This is the most critical adjustment. Incorrect seat height is a primary cause of knee pain.
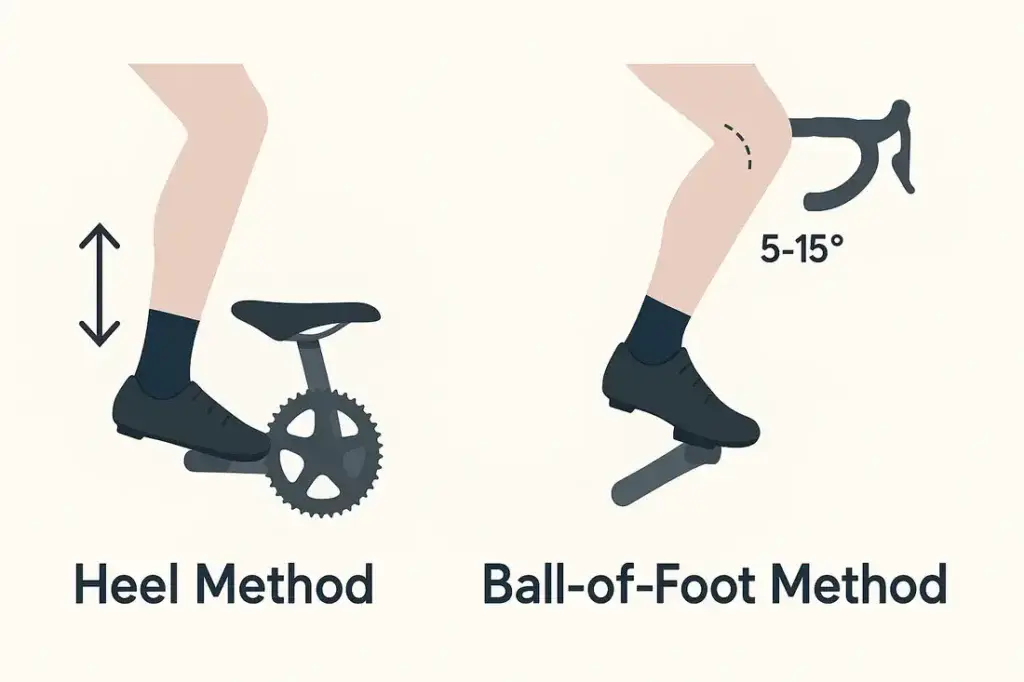
- The Heel-to-Pedal Method (Quick Start):
- Sit firmly on the saddle of your exercise bike.
- Place your HEEL (not the ball of your foot) on one pedal.
- Rotate the pedal backward until it’s at the very bottom of its stroke (the 6 o’clock position).
- Your leg should be completely straight, or almost straight with a very slight, soft bend (a “soft knee”). Your hips should not rock side-to-side to reach the pedal.
- Adjust the seat height up or down until you achieve this position.
- Pro Tip: If you have to rock your hips to reach the pedal, your seat is too high.
- The Ball-of-Foot Method (Fine-Tuning / Preferred for Riding):
- Once you’ve done the heel method, now place the BALL of your foot on the pedal (this is how you’ll actually pedal).
- Rotate the pedal to the very bottom of its stroke.
- Observe your knee: it should have a slight bend – typically around 5-15 degrees. Your knee should never be locked straight or excessively bent.
- Visual cue: Look for a very slight “break” in the knee, not a locked-out position.
- Common Mistakes & Fixes for Seat Height:
- Seat Too Low: Your knee will be excessively bent at the bottom of the stroke. This can lead to pain in the front of the knee, as well as reduced power output. Fix: Raise the saddle.
- Seat Too High: Your hips will rock side-to-side as you try to reach the pedals at the bottom of the stroke. This can cause pain behind the knee (hamstring strain) or in the lower back. Fix: Lower the saddle.
B. NAILING SEAT FORE/AFT POSITION (Horizontal) – Getting Your Knees Aligned
This adjustment moves your saddle forward or backward relative to the pedals. It’s crucial for knee health and efficient power.
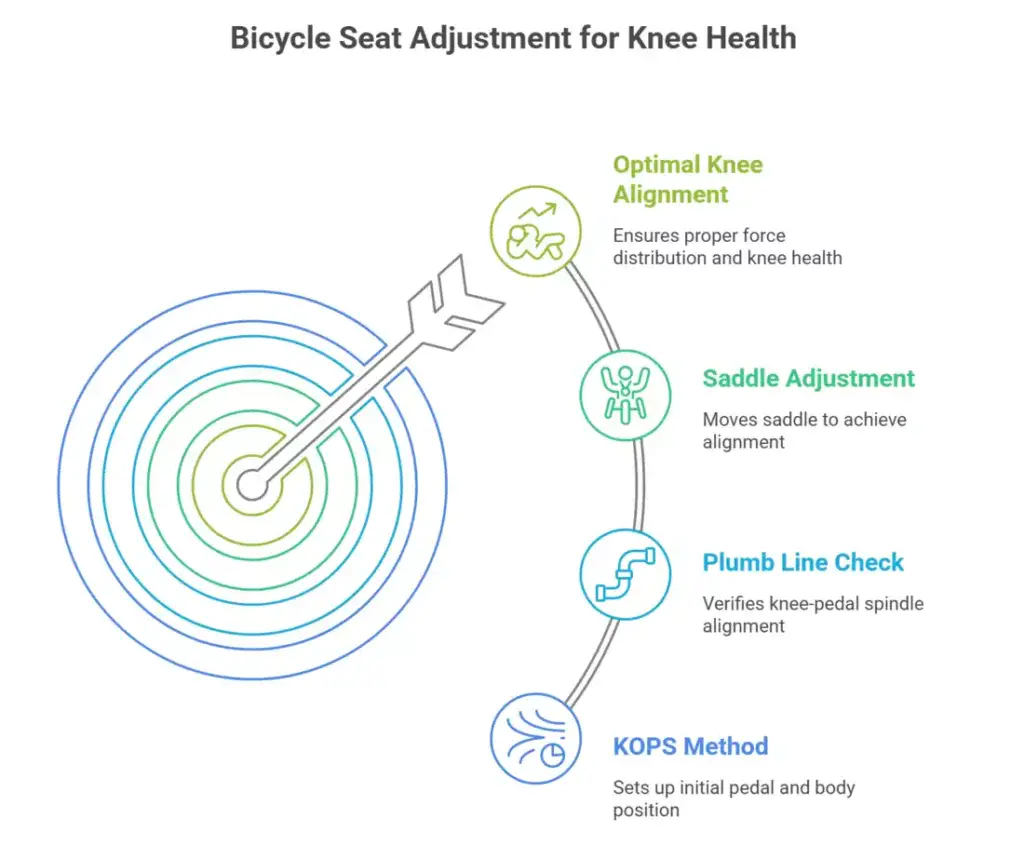
- The KOPS Method (Knee Over Pedal Spindle):
- Once your seat height is set, get on the bike and position your pedals so they are parallel to the floor (one crank arm at 3 o’clock, the other at 9 o’clock). Your front foot should be forward.
- Using a plumb line (or carefully eyeballing it), a vertical line dropped from the bony protrusion just below your kneecap (the tibial tuberosity) on your front leg should pass directly through the center of the pedal spindle (the axle that the pedal rotates around).
- Adjust the saddle forward or backward along its rail to achieve this alignment.
- Why it matters: This position helps ensure that the forces generated by your pedaling are distributed correctly through your knee joint.
- Common Mistakes & Fixes for Seat Fore/Aft:
- Saddle Too Far Forward: Your knee will be significantly in front of the pedal spindle. This can increase pressure on the kneecap and lead to anterior knee pain. Fix: Move the saddle back.
- Saddle Too Far Back: Your knee will be behind the pedal spindle. This can put more strain on your hamstrings and glutes, potentially leading to discomfort or reduced power. Fix: Move the saddle forward.
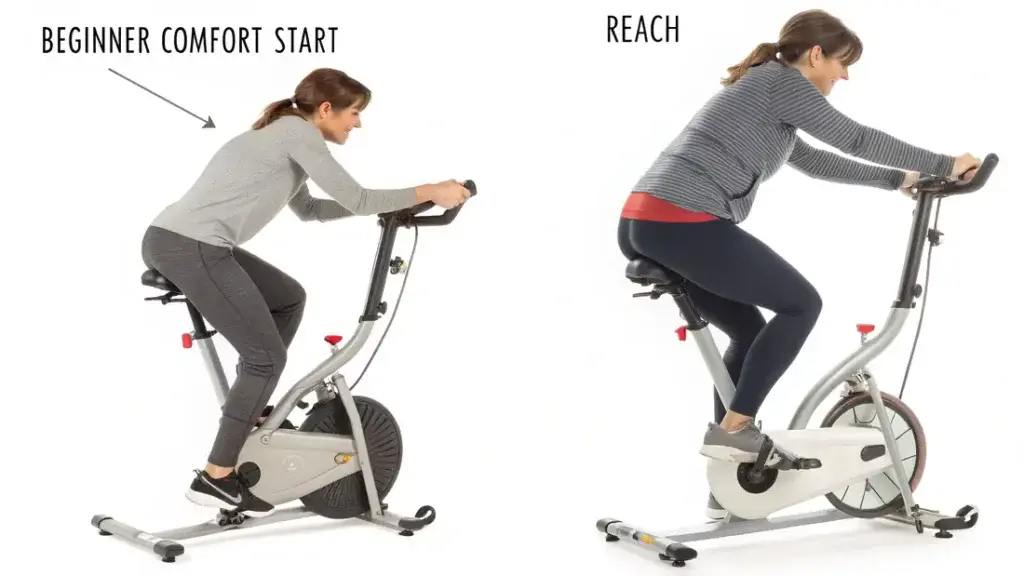
C. HARMONIZING HANDLEBAR HEIGHT – Comfort for Your Upper Body
Handlebar position significantly impacts your comfort, posture, and any strain on your neck, shoulders, and wrists.
- General Beginner Guideline:
- For most beginners on Upright Bikes, it’s generally best to start with the handlebars level with or slightly higher than the saddle. This promotes a more upright, relaxed posture, taking pressure off your hands and lower back.
- For Spin Bikes, ambitious beginners might start with handlebars level with the saddle, but many will find it more comfortable to start slightly higher and gradually lower them as their core strength and flexibility improve.
- Recumbent Bikes: Handlebars are typically in a fixed, ergonomic position, so this adjustment is usually not applicable.
- How it Affects You:
- Higher Handlebars: More upright posture, less weight on your hands/wrists, reduced strain on the lower back. This is often the most comfortable position for beginners.
- Lower Handlebars: A more aerodynamic and aggressive posture (more common for experienced outdoor cyclists). This can engage the core more but is more demanding on flexibility and can increase strain on the hands and back if you’re not ready.
- Listen to Your Body: Adjust the handlebar height for minimal strain on your neck, shoulders, and wrists. You shouldn’t feel like you’re hunching or excessively stretching.
D. DIALING IN HANDLEBAR REACH (If Adjustable) – Finding Your Sweet Spot
Some bikes (especially spin bikes and higher-end uprights) allow you to adjust the handlebars horizontally (closer or further from the saddle).
- What is Reach? It’s the horizontal distance from your saddle to your handlebars.
- General Feel:
- When holding the handlebars, you should have a slight, comfortable bend in your elbows.
- Your shoulders should be relaxed, not shrugged up towards your ears.
- You shouldn’t feel overstretched, reaching awkwardly, or cramped and hunched.
- Adjusting: Move the handlebars closer or further away until you find that natural elbow bend and a relaxed, comfortable upper body position.
Personal Anecdote: I remember my first few rides on an upright bike, my hands would ache because I was putting too much weight on them. Raising the handlebars slightly and ensuring my elbows had a soft bend made an immediate and huge difference in my comfort and enjoyment!
Bike-Specific Setup Nuances – Upright vs. Recumbent vs. Spin
While the “Core Four” adjustments apply broadly, each bike type has slightly different setup priorities for beginners.
| Bike Type | Key Setup Priority for Beginners | Common Beginner Starting Point / Tip |
| Upright | Seat Height (knee bend), Seat Fore/Aft (knee alignment), Handlebar Height (comfort) | Handlebars level with or slightly above saddle for an upright posture. |
| Recumbent | Seat Distance from Pedals (ensuring slight knee bend) | Adjust the entire seat unit forward/back until the knee bend is correct; backrest takes care of upper body. |
| Spin Bike | Seat Height, Seat Fore/Aft, Handlebar Height & Reach (Precision is Key) | Often start with handlebars higher than pro cyclists, then experiment; check cleat position if using clipless pedals. |
- A. Upright Bike Specifics: The main challenge is balancing comfort (often achieved with a higher handlebar) with an engaged, efficient pedaling posture.
- B. Recumbent Bike Specifics: Since you have a backrest, the focus shifts almost entirely to getting the correct leg extension by adjusting the seat unit along its rail. The handlebars are usually fixed for arm support.
- C. Spin Bike Specifics: These often offer the most adjustment points (height, fore/aft for both seat and handlebars). This means more opportunity for a precise fit, but also a steeper learning curve to get it right. For beginners, prioritizing comfort over an aggressive “aero” position is wise.
The Test Ride & Fine-Tuning – Your First Few Pedal Strokes
Once you’ve made your initial adjustments, it’s time for the true test.
A. Hop On and Pedal Slowly
Start pedaling at a very light resistance for 5-10 minutes. How does it feel?
- Any immediate areas of discomfort: knees, lower back, neck, shoulders, wrists?
- Do your hips rock side-to-side excessively?
B. Check for Hip Rocking
This is a very common sign that your saddle is too high. If you have to rock your hips significantly to reach the bottom of the pedal stroke, lower the seat by half an inch and re-test.
C. Small Adjustments Go a Long Way
Don’t be afraid to hop off, make a small tweak (even just a quarter or half an inch), and hop back on. These minor adjustments can sometimes make a huge difference in how the bike feels.
D. Re-Check After a Short Ride (5-10 minutes)
Sometimes, issues only become apparent after you’ve been in the saddle for a few minutes. If you notice persistent discomfort, make another small adjustment and re-test.
Troubleshooting Common Setup Issues for Beginners
Even with the best intentions, you might encounter some common discomforts. Here’s a quick guide:
- “My knees hurt (especially the front).”
- Likely Cause: Saddle is too low or too far forward.
- Fix: Try raising the saddle slightly (1/2 inch at a time) using the heel-to-pedal method. Also, ensure your knee is aligned over the pedal spindle (KOPS method).
- “My lower back aches.”
- Likely Cause: You’re reaching too far for the handlebars, or your saddle is tilted incorrectly (nose too high/low).
- Fix: Try raising the handlebars, or moving them closer (if adjustable). Ensure your saddle is level. If it persists, you might need a bike that offers a more upright posture (e.g., a recumbent).
- “My hands/wrists are numb or sore.”
- Likely Cause: Too much weight is being placed on your hands, often because handlebars are too low or too far away.
- Fix: Try raising the handlebars, or moving them closer (if adjustable). Ensure your elbows have a slight bend, and your shoulders are relaxed, not hunched.
- “Saddle discomfort (the dreaded ‘sore butt’).”
- Likely Cause: This is incredibly common initially as your body adapts.
- Fix: Ensure your saddle is perfectly level (not tilted up or down). Give your body a few rides to adapt. If persistent, consider padded cycling shorts, a gel seat cover, or eventually, a different saddle. This is often the most common complaint for beginners and usually resolves with time and proper adjustment.
Frequently Asked Questions (FAQs) on Exercise Bike Setup
- Q1: How often should I check my exercise bike setup after the initial adjustment?
- A: Once you’ve found your sweet spot, your setup should remain fairly consistent. However, it’s wise to re-check if something feels “off,” if you’ve taken a long break from cycling, or if someone else has used the bike and adjusted it. You might also fine-tune small things as your fitness improves and your body adapts.
- Q2: Does it really matter if my exercise bike setup isn’t “perfect”? What’s the worst that can happen?
- A: While “perfect” is often a journey, getting it “very good” matters immensely. Significant deviations from proper fit can lead to chronic discomfort, reduced workout effectiveness, and increase your risk of overuse injuries (like knee pain or lower back strain) over time. Don’t let a poor setup derail your fitness goals!
- Q3: Can I use online bike fit calculators designed for outdoor bikes for my stationary bike?
- A: Online calculators can provide a rough starting point for measurements, but the hands-on, iterative methods described here (Heel-to-Pedal, KOPS) are generally more practical and effective for stationary bikes. How your body feels in the saddle is the ultimate indicator.
- Q4: What if my specific exercise bike doesn’t have all these adjustment points (e.g., no fore/aft seat adjustment)?
- A: If your bike has limited adjustments, prioritize getting the seat height correct first. Do your best within the bike’s constraints for other points. This highlights why choosing a bike with ample Essential Exercise Bike Features (especially adjustability) is important when purchasing. Pay extra attention to any discomfort signals from your body.
Conclusion – Ride in Comfort, Ride with Power – Setup is Your Secret Weapon
Mastering your exercise bike setup for beginners is one of the most impactful things you can do to ensure a successful and enjoyable home fitness journey.
It’s a simple, yet powerful, investment in your comfort, efficiency, and long-term well-being.
Don’t let guesswork lead to discomfort.
By following these foolproof steps for seat height, fore/aft position, and handlebar placement, you’ll transform your exercise bike into a perfectly fitted machine, ready to support you through every pedal stroke.
Remember to listen to your body, and don’t hesitate to make small adjustments as you ride and grow stronger.
Now that your bike is perfectly set up, what’s next? Share your setup tips or any breakthroughs you’ve had in the comments below!
Ready for your first perfectly tailored ride?
- Discover effective routines: Check out our Basic Exercise Bike Workouts to Get Started!
- Still deciding on the bike type? Revisit: Upright vs. Recumbent vs. Spin Bikes: Which Suits Beginners Best?
- For the complete picture of home cycling success, explore our Ultimate Beginner’s Guide to Choosing and Using an Exercise Bike at Home.
Happy pedaling, with perfect posture!