When your lower back is aching, your first instinct might be to grab a foam roller and go to work directly on the point of pain.
Stop.
This is the single biggest—and most dangerous—mistake you can make.
While a foam roller is a fantastic tool for alleviating back pain, you must never use it directly on your lower back.
This guide will show you the safe, physical-therapist-approved method for relieving lower back pain by focusing on the muscles that are the real cause of your discomfort.
For a full overview of foam rolling, start with our Ultimate Beginner’s Guide.
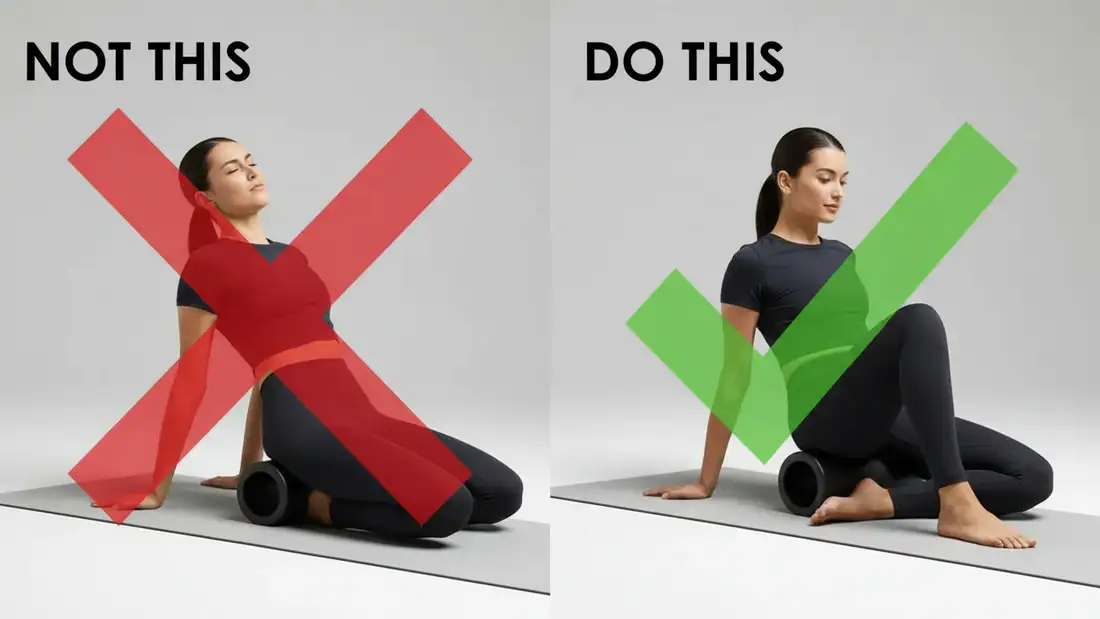
The #1 Rule: Why You MUST NOT Roll Your Lower Back
It might seem counterintuitive, but applying direct pressure to your lumbar spine is a recipe for disaster.
Here’s why: your spine is not a single, solid block.
Your upper-to-mid back (thoracic spine) is protected and supported by your rib cage, making it safe to roll.
Your lower back (lumbar spine), however, is unsupported.
This is a warning echoed by physical therapists.
As explained in a health guide from SELF Magazine, your spine can’t handle the direct pressure in this area, which can cause the surrounding muscles to spasm in a protective effort and potentially lead to injury.
This can cause the surrounding muscles to spasm in a protective effort, making your pain much worse and potentially leading to serious injury.
This is, without a doubt, the most critical error to avoid, as we detail in our guide to the 7 Common Foam Rolling Mistakes (And How to Fix Them).
The Real Culprits – The Muscles That ACTUALLY Cause Back Pain
So, if you can’t roll your back, how do you relieve the pain?
By understanding the concept of referred pain. In most cases, lower back pain is a symptom, not the root cause.
The pain is the victim, not the villain.

The real culprits are the tight muscles in your lower body that connect to your pelvis and spine.
When these muscles are tight, they pull on your pelvis, tilting it out of alignment and placing a constant strain on your lower back.
The three main culprits are:
- Tight Glutes & Piriformis: Long periods of sitting can cause these powerful hip muscles to become tight and knotted, directly impacting your lower back.
- Tight Hip Flexors: Located at the front of your hips, these muscles get chronically shortened from sitting. This pulls your pelvis forward, creating an arch and strain in your lower back. This is the hidden connection between tight hip flexors and lower back pain.
- Tight Hamstrings: The muscles on the back of your thighs also attach to your pelvis. When they are tight, they pull the pelvis down, flattening your back and causing strain.
The 4-Move Routine to Safely Relieve Lower Back Pain
This simple routine targets the root causes of lower back pain, not the symptoms.
Spend 1-2 minutes on each movement, focusing on slow, controlled rolls and breathing deeply.
1. The Glute and Piriformis Roll
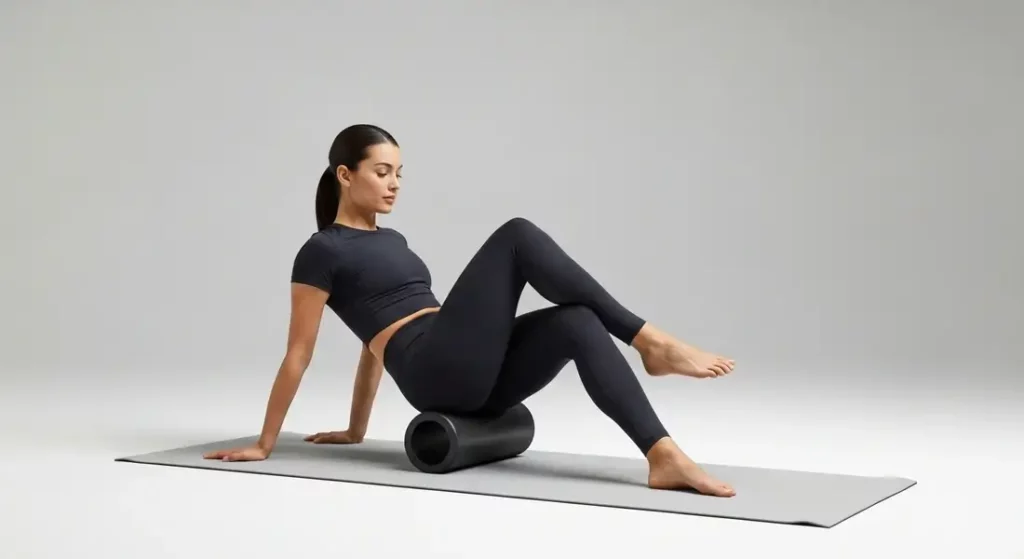
This is your number one move for back pain.
Releasing the glutes and the deep piriformis muscle provides immediate relief from the tension pulling on your lumbar region.
- Sit on the foam roller with your knees bent and feet flat on the floor.
- Shift your weight onto one glute and cross that same leg over the opposite knee, creating a “figure-four” shape.
- Use your hands for support behind you and roll slowly over the entire glute area, pausing for 20-30 seconds on any particularly tender spots.
- Repeat on the other side.
2. The Hip Flexor Release
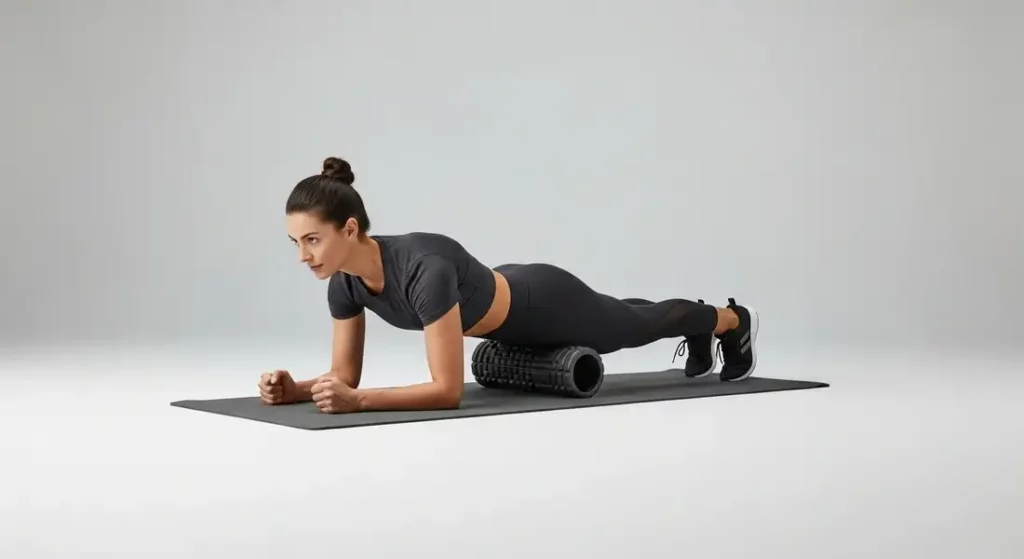
Loosening your hip flexors allows your pelvis to return to a more neutral, relaxed position, taking pressure off your lower back.
- Lie face down and place the foam roller just below your hip bone on one side.
- Prop yourself up on your elbows and keep the other leg bent and out to the side for stability.
- Use very small, slow rolls to explore the area at the top of your quad.
- Repeat on the other side.
3. The Hamstring Roll

Releasing your hamstrings reduces the downward pull on your pelvis, which helps to alleviate strain on your lower back.
- Sit on the floor with the roller positioned under your upper thighs.
- Place your hands behind you for support and lift your hips.
- Slowly roll down the back of your leg, from the base of your glutes to just above the back of your knee. For more pressure, do one leg at a time.
- Repeat on the other side.
4. The Upper Back Roll
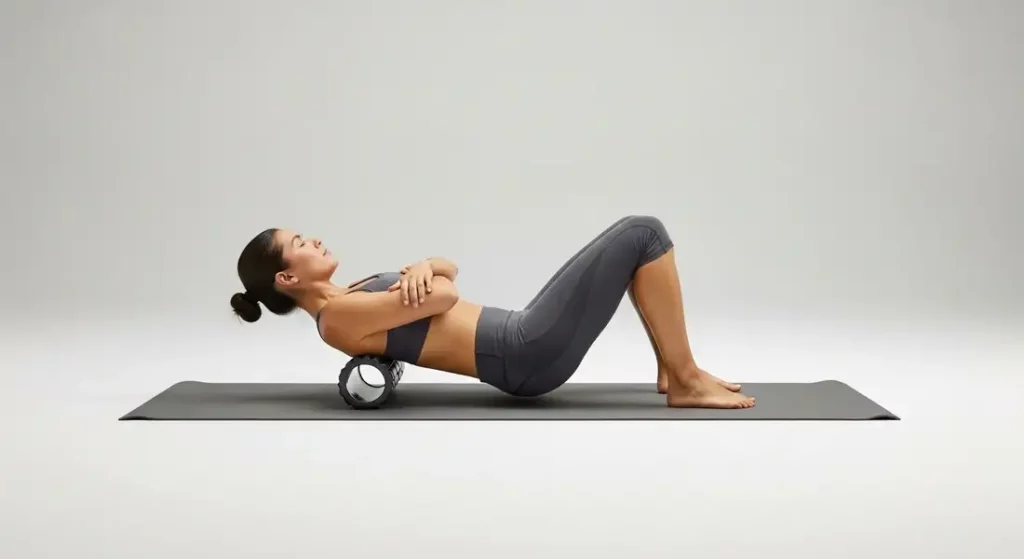
While it doesn’t directly connect to the lower back, releasing tension in your thoracic spine improves your overall posture, which reduces downstream strain on your lumbar region.
- Lie on your back with the foam roller positioned under your shoulder blades.
- Bend your knees and cross your arms over your chest.
- Lift your hips and use your feet to slowly roll up and down your mid-to-upper back.
Key Takeaways – The Safe Back Pain Protocol
| Do This (Roll These Muscles) | Don’t Do This (Avoid This Area) | Why it Works |
| Glutes, Hips, Hamstrings | Your Lower Back (Lumbar Spine) | You’re treating the cause, not the symptom. |
| Upper Back (Thoracic Spine) | Your Neck or Bony Parts of Spine | Improves posture, reducing overall strain. |
Frequently Asked Questions (FAQ)
Q: Can foam rolling make my back pain worse?
A: Yes, if done incorrectly. Rolling directly on your lower back can significantly increase pain and inflammation. However, when you follow the safe protocol of rolling the surrounding muscles (glutes, hips, hamstrings), it is a highly effective way to relieve pain.
Q: How often should I do this routine for back pain?
A: For acute tightness, you can perform this routine daily. For general maintenance, 3-4 times per week is an excellent goal. Consistency is more important than intensity.
Q: What should I do if my back pain doesn’t go away after foam rolling?
A: A foam roller is a tool for muscle tightness, not a cure for all back pain. If your pain is sharp, radiates down your leg, or persists for more than a week, you must stop and consult a doctor or physical therapist to rule out a more serious underlying condition.
Conclusion – Treat the Cause, Not the Symptom
The key to relieving lower back pain with a foam roller is to shift your focus.
Instead of attacking the site of the pain, you now have a safe and effective plan to treat the root causes of the problem.
By consistently releasing the tension in your glutes, hips, and hamstrings, you allow your pelvis and spine to return to a neutral, pain-free state.
To see these safe techniques demonstrated by a medical professional, watch this excellent guide from a certified physical therapist:
This proactive approach is not just a temporary fix; it’s a long-term strategy for better movement and a healthier back.
Your Next Step in Building a Resilient Body
You’ve learned how to safely manage one of the most common aches and pains.
Now, consider exploring other ways to build a stronger, more resilient body from the comfort of your home.
- Explore our Ultimate Beginner’s Guide to Setting Up Your Dream Home Gym to create your perfect workout space.
- Discover other powerful tools in our complete library of Muscle Recovery Guides.